It's Valentine's Day and I knew my kiddos needed something fun to wear to celebrate. I found puppy dog fabric that I thought would be cute for both of the kids even though it's not completely my style. Sister insisted on a long skirt and Brother still is young enough that he doesn't care what I make for him.
Before I showcase this year's outfits, I want to do a little throwback moment to Sister's first Valentine's Day. It was one of the first items I sewed after getting a sewing machine. I learned how to sew in elementary school in the 4-H program, and a cousin helped me sew a quilt in college, but this is one of my first projects that helped jumpstart my current sewing passion. This was in 2012:
On to this year's outfits!
I purchased the dog print fabric from JoAnn's. Over the past 2+ years I have been introduced to the world of designer fabric (Art Gallery, Riley Blake, etc...) and whenever I buy cheaper fabric, I usually regret it. This was true this time. The quality isn't nearly as soft and even with Color Catchers, the dogs have a pink tint to them. Other than that, the fabric was adorable and worked fine for today.
The solid fabric, however, is Riley Blake Solid Basics and is simply FANTASTIC! I love working with the Riley Blake solid prints because they feel great and the look great over multiple wears and washings!
For Sister, I mashed up two Pink Fig patterns. This year one of my goal's is to think outside the box a little on fabric pairings, and Pink Fig is the perfect designer to encourage that! For her skirt, I used the waistband from Sugar and Spice Skirt. I loved how I could use fabric scraps from other Valentine's Day prints to add a little fun. I then used the skirt and sash from the Mimi's Maxi Skirt. I simply love how it turned out!
There were a few modifications that I made. One modification is that I shifted the panel over so it started at her side and then went to about center front instead of having it perfectly centered. We then tied the sash to the side over the black panel to add a little pop of color!
Also, I had the sash come around from more in the back than the side seams. Just for fun.
Okay, now get a load of these bows. I mean, seriously, aren't they darling?!?! The very talented owner of Little Bow Pat made these based on a picture of my fabric. Her work and attention to detail is amazing! Oh, and she is simply charming to work with. If you don't currently have a favorite shop to get hairbows, head on over to her Facebook page and let her know I sent you!
My sweet little Valentine is rocking yet another Oliver + S Art Museum Vest. This is my fourth time making a vest (3 for him and one as a gift) and I am simply in love with the fit and style of this vest! This time around I left off the welt pockets for a change of pace, but that was the only modification.
I also made him a little tie using the Boy's Tie pattern from Fuddie Duddies. It's darling and is super quick to sew together! Thankfully it was able to be cut on the grain, because I was squeezing every last bit of my solid black fabric to get it made. Not joking.
And here is one quick snapshot of our family. I am so thankful for our little family and the fun and love that we have not just on Valentine's Day, but everyday.
Sunday, February 14, 2016
Friday, February 5, 2016
Doll Diaper Bag (Stash Sewing)
Confession time: I love sewing doll items. After mastering the ruffle bum onesie for my daughter, my next sewing project had been a doll dress. That is how I re-taught myself to sew. Dolls aren't picky about what their outfit looks like, if you completely mess up, and not that much fabric is wasted. But I digress.....
Two Christmas's ago, I made a Very Hungry Caterpillar diaper bag set for my daughter for Christmas using this pattern by Petite Nola Boutique. It is simply darling and wonderful! She took this with her everywhere and it was a part of almost every game she played for 2 years.
Last year, I made another one just for fun and was planning on selling it......Sister found it and claimed it as her own. This one uses a now out of print fabric that I purchased from Whimsical Fabric for my daughter's 4th birthday outfit. Since this was my second one, I made a few modifications on the diaper bag (mainly just off centered the inner pocket seam so there was one bigger pocket and one smaller pocket). I also only used fusible fleece on the outer layers of the diaper bag and left the lining fabric fleece-free to reduce bulk.
I traced part of the scene onto white fabric and did hand embroidery for the front pocket on the diaper bag. I just love how the large pocket is perfect for fun details such as this.
Oh, did I mention this is a super quick project to sew?!?! Not kidding, it goes so quickly. This week I made a diaper bag set for an upcoming birthday party. I pulled out all the stops and even made a bib. Turning the bib was a beast because of those little straps, but that was my only issue overall.
Just to get an idea of how much fits in this bag, here is an inside shot:
I put the changing pad in the front pocket, then the diapers in the main pocket. The wipes case and bib go in the inner pockets. There is still plenty of room for other baby doll necessities.
Two years ago I made the birthday girl's birthday dress and happened to still have some left over. As a sweet surprise, I made a diaper out of some of the leftover fabric I had on hand.
I had originally only planned on two diapers, but Sister came over and informed me that doll diaper bags are much better with 3 diapers AND that every little girl simply NEEDS a button diaper. She is so sweet and thoughtful about dolls.
Finally, I made one last partial set for a friend just because I thought it would be a fun surprise for her daughter. This time I mainly used prints from Whimsical Fabric that I simply adore. The Color Me fabric has quickly become a favorite print in our home and I am frequently finding fun uses for it! The diaper prints were also from Whimsical Fabric but are now out of print.
Overall I simply love this pattern and it is quickly becoming my go to pattern. After my first time making it, I started to modify the steps to my personal preference which speeds up the process.
The pattern pieces are hand drawn or measurements (for the diaper bag, changing pad, and wipes case), but all are spot on and a great fit!
If you have any doll loving little ones in your life, be sure to head over toPetite Nola Boutique and pick up your own copy of the doll diaper bag and accessories pattern.
Two Christmas's ago, I made a Very Hungry Caterpillar diaper bag set for my daughter for Christmas using this pattern by Petite Nola Boutique. It is simply darling and wonderful! She took this with her everywhere and it was a part of almost every game she played for 2 years.
Last year, I made another one just for fun and was planning on selling it......Sister found it and claimed it as her own. This one uses a now out of print fabric that I purchased from Whimsical Fabric for my daughter's 4th birthday outfit. Since this was my second one, I made a few modifications on the diaper bag (mainly just off centered the inner pocket seam so there was one bigger pocket and one smaller pocket). I also only used fusible fleece on the outer layers of the diaper bag and left the lining fabric fleece-free to reduce bulk.
I traced part of the scene onto white fabric and did hand embroidery for the front pocket on the diaper bag. I just love how the large pocket is perfect for fun details such as this.
Oh, did I mention this is a super quick project to sew?!?! Not kidding, it goes so quickly. This week I made a diaper bag set for an upcoming birthday party. I pulled out all the stops and even made a bib. Turning the bib was a beast because of those little straps, but that was my only issue overall.
Just to get an idea of how much fits in this bag, here is an inside shot:
I put the changing pad in the front pocket, then the diapers in the main pocket. The wipes case and bib go in the inner pockets. There is still plenty of room for other baby doll necessities.
Two years ago I made the birthday girl's birthday dress and happened to still have some left over. As a sweet surprise, I made a diaper out of some of the leftover fabric I had on hand.
I had originally only planned on two diapers, but Sister came over and informed me that doll diaper bags are much better with 3 diapers AND that every little girl simply NEEDS a button diaper. She is so sweet and thoughtful about dolls.
Finally, I made one last partial set for a friend just because I thought it would be a fun surprise for her daughter. This time I mainly used prints from Whimsical Fabric that I simply adore. The Color Me fabric has quickly become a favorite print in our home and I am frequently finding fun uses for it! The diaper prints were also from Whimsical Fabric but are now out of print.
Overall I simply love this pattern and it is quickly becoming my go to pattern. After my first time making it, I started to modify the steps to my personal preference which speeds up the process.
The pattern pieces are hand drawn or measurements (for the diaper bag, changing pad, and wipes case), but all are spot on and a great fit!
If you have any doll loving little ones in your life, be sure to head over toPetite Nola Boutique and pick up your own copy of the doll diaper bag and accessories pattern.
Saturday, January 30, 2016
A Vision to Remember: Addy Mae Blog Tour
I was recently asked by Connected By A Thread to participate in the A Vision to Remember blog tour. A few months ago, I was part of the AVTR Easy Peasy Rag Quilt blog tour and had such a great time sewing up a quilt for my kids. Click here to read more about that quilt!
This time around, I wanted to make a quilt for a very dear friend of mine. Her and I share so many of the same loves: Doris Day, tea, books, classic movies, the beach, and flip flops just to name a few. To celebrate our 30th birthdays this year, we splurged and spent the weekend at the Doris Day Hotel in Carmel by the Sea, California. Coolest vacation ever.
On to the quilt! When the blog tour call was posted for the Addy Mae Rag Quilt pattern blog tour, I knew this pattern would be spot on for my friend! I simply loved how it has several big squares (approx 9"x9" to showcase larger prints) and had several medium squares to feature other favorite fabrics and colors. From using other patterns from this designer, I knew the instructions would be spot on and easy to follow. This pattern features options for a baby blanket, toddler/child blanket, and an add on to make the baby blanket into a car seat cover. I opted for the larger size blanket, but wanted a little extra length. It was easy to add on the length, I simply found where the blanket repeated and added an extra section (for this quilt, I added an additional two large squares in length).
Another great feature on this pattern is that it includes a line diagram, I printed off two copies of that page and grabbed my daughters markers and set to work with my planning and scheming. That helped a ton with knowing what fabrics I needed to cut to what size.
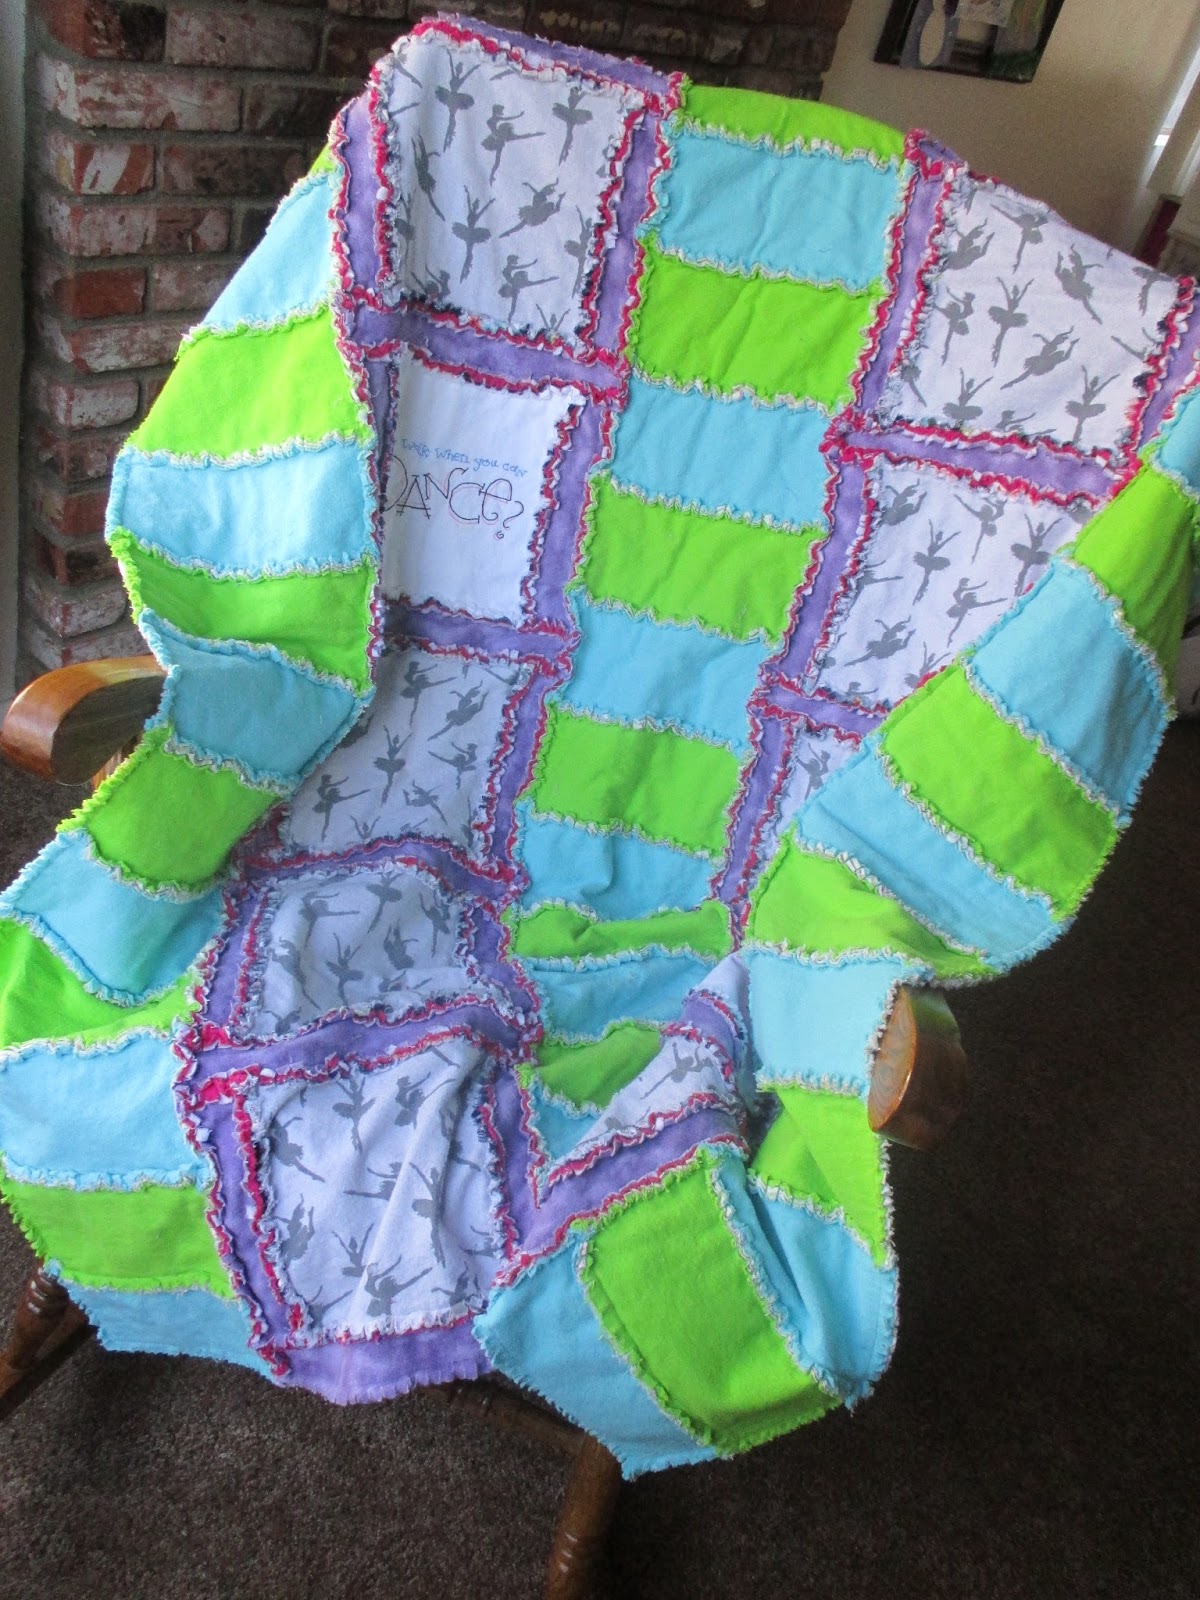
My friend loves dance, and I knew I needed to incorporate it somewhere in the quilt. While the pattern recommends at least one layer is flannel (it frays better), quilting cotton works well, so I made two squares with quilting cotton. On one I drew two dancers using a pattern from Twin Stitchers. It was meant to be hand embroidered, but I just loved the look of simply using fabric markers.
The rest of the Twin Stitchers dancer pattern included this lovely phrase. Again, I mainly used fabric marker, but I really wanted the word "dance" to pop, so I hand embroidered that word. Isn't it darling! I did have to shrink the wording slightly to fit it nicely on the square.
The perk of rag quilts is they go together very quickly. The front and back are sewn together at the same time, so I honestly spent more time cutting and planning than sewing. I sewed the entire blanket together in one day with several interruptions. I love how the back of the quilt can be a completely different color scheme. It almost feels like having two styles of a quilt in one! For the back, I found a darling friendship quote flannel fabric from www.joann.com. I used that as the basis of my color scheme for the back of the quilt. While shopping on the JoAnn website, I also came across the tea fabric and really wanted to feature the darling tea cups.
After sewing it all together, all the seams need to be clipped. This is the perfect way to spend the kid's nap time on a winter afternoon. I turned on Netflix, snuggled up under the quilt and started snipping. It's relaxing and a good excuse to sit around and catch up on favorite shows.
When making the Easy Peasy Rag Quilt, I mentioned to the designer about how much it made my hands hurt trying to snip it with my sewing scissors. She recommended the Heritage Rag Snips and they are completely worth the investment! I was able to snip this during Saturday evening and start back up Sunday morning on the drive to and from church. By the time I was finished, my hand barely hurt at all! They were wonderful and I am so thankful for the great customer service that was offered by the owner of A Vision to Remember on Facebook!
A Vision to Remember Addy Mae is the perfect gift for all those little babies this winter! Be sure to check out the different blankets this week!
Jan 26- Larissa from Connected by a thread
Jan 27- JaNette from Merri Poppins
Jan 28- Patricia from Sew Far North
Jan 29- Essence from Adventures with Bubba and Bug
Jan 30- Jona from Stitches & Spills
Wednesday, December 30, 2015
Whimsical Fabric Wacky Wednesday Bundle Review
A few times a month, Whimsical Fabric and Me offers a Wacky Wednesday bundle sale. These sale offer great fabrics at a great price! What is even better, most of the time they are out of print fabrics and can be tricky to find all of the bundle fabrics in another shop.
This weeks bundle has fabric from Riley Blake Lost and Found Love. And just look at how darling it is!
Whimsical Applique has also launched some embroidery designs that are EXCLUSIVE to Whimsical Applique and can not be found anywhere else. These have been designed to coordinate with the fabrics in this bundle and a discount can be found in Whimsical Fabric and Me.
To help promote the sale and showcase just what can be done with a bundle, I offered to buy a bundle a head of time and sew up a few projects. As soon as I saw the fabric, I knew that it would be the perfect fabric to use for a church event. Every year we have a Women's Dessert Night that is full of music, fun, food, and beautiful tables. From time to time I offer to host a table and I get the opportunity to decorate and have a little (or a lot) of creative fun!
Because I knew I wanted to make cloth napkins for nine people, I did order a little extra fabric, so here is what I ordered:
1 full yard bundle found here
0.5 yd black/licorice
0.75 yd off white/whisper white
1.5 yd Wagon Red Shade Basics
1 yd lace (in addition to the fabric included in the bundle)
0.5 yd stripe (in addition to the fabric included in the bundle).
Now to see all of my pretties! Here is my table for the event:
For my centerpiece, I made two doll dresses for my American Girl dolls. The dolls are my childhood dolls, Samantha, and one that looks like me. The blonde doll is wearing the O+S Tea Party Dress from Little Things To Sew book. Her hair accessory is modified from the Sew Classic Clothes for Girls book.
Samantha is wearing a modified Ellie Inspired Mini Miss Mary Mack with an added sewn in sash. Samantha has a self drafted ruffled headband.
To continue with the theme, I made nine total cloth napkins with a few from each fabric. Then Pinterest saved the day with this cute Christmas tree napkin folding tutorial. The pins are Modkid pins that used to be in stock at Whimsical Fabric. The snowflakes were made by my great-grandma for her Christmas tree and they are one of the only items that I received from her over the years. I love decorating with them year after year and thinking about how must have millions of Christmas stories tied up in them?!?!
Now onto the quilted table runner. I quilted once 10 years ago and haven't done any quilting since. On a recent date night, hubby and I splurged and bought hobby magazines. I found this Quilting Quickly and fell in love with the table runner. I just knew it would be simply perfect for the table centerpiece. My squares are far from perfect and it doesn't completely line up, but all together, it looks pretty decent!
Now to show you what I have left after making a table runner, two doll dresses, two doll headbands, and nine cloth napkins.
Literally scraps left from one yard of the hearts and one yard of the flowers (both are folded in half).
Right under a half yard left from 2 yards of the lace fabric.
I had 33 inches left of the 1.5 yards of the stripe fabric. I intentionally didn't use all of this because I thought it would make a cute little skirt for Sister to wear in the spring, or maybe a button up shirt. Not sure what, but I just loved the subtle colors.
Still with me? Now that you have seen an idea of what can be done with this bundle, click on over to Whimsical Fabric and Me and buy this bundle! Also, be sure to check out the contest that you can enter by purchasing and sewing up this bundle. Then, come back to enjoy some cute kid pictures as my daughter had her own dolly and me Dessert Night the next morning.
This weeks bundle has fabric from Riley Blake Lost and Found Love. And just look at how darling it is!
Whimsical Applique has also launched some embroidery designs that are EXCLUSIVE to Whimsical Applique and can not be found anywhere else. These have been designed to coordinate with the fabrics in this bundle and a discount can be found in Whimsical Fabric and Me.
To help promote the sale and showcase just what can be done with a bundle, I offered to buy a bundle a head of time and sew up a few projects. As soon as I saw the fabric, I knew that it would be the perfect fabric to use for a church event. Every year we have a Women's Dessert Night that is full of music, fun, food, and beautiful tables. From time to time I offer to host a table and I get the opportunity to decorate and have a little (or a lot) of creative fun!
Because I knew I wanted to make cloth napkins for nine people, I did order a little extra fabric, so here is what I ordered:
1 full yard bundle found here
0.5 yd black/licorice
0.75 yd off white/whisper white
1.5 yd Wagon Red Shade Basics
1 yd lace (in addition to the fabric included in the bundle)
0.5 yd stripe (in addition to the fabric included in the bundle).
Now to see all of my pretties! Here is my table for the event:
For my centerpiece, I made two doll dresses for my American Girl dolls. The dolls are my childhood dolls, Samantha, and one that looks like me. The blonde doll is wearing the O+S Tea Party Dress from Little Things To Sew book. Her hair accessory is modified from the Sew Classic Clothes for Girls book.
Samantha is wearing a modified Ellie Inspired Mini Miss Mary Mack with an added sewn in sash. Samantha has a self drafted ruffled headband.
| How sweet is this little button?!?! I found it at a little shop in Carmel, Ca on vacation a few months ago. |
To continue with the theme, I made nine total cloth napkins with a few from each fabric. Then Pinterest saved the day with this cute Christmas tree napkin folding tutorial. The pins are Modkid pins that used to be in stock at Whimsical Fabric. The snowflakes were made by my great-grandma for her Christmas tree and they are one of the only items that I received from her over the years. I love decorating with them year after year and thinking about how must have millions of Christmas stories tied up in them?!?!
Now onto the quilted table runner. I quilted once 10 years ago and haven't done any quilting since. On a recent date night, hubby and I splurged and bought hobby magazines. I found this Quilting Quickly and fell in love with the table runner. I just knew it would be simply perfect for the table centerpiece. My squares are far from perfect and it doesn't completely line up, but all together, it looks pretty decent!
Now to show you what I have left after making a table runner, two doll dresses, two doll headbands, and nine cloth napkins.
Literally scraps left from one yard of the hearts and one yard of the flowers (both are folded in half).
Right under a half yard left from 2 yards of the lace fabric.
I had 33 inches left of the 1.5 yards of the stripe fabric. I intentionally didn't use all of this because I thought it would make a cute little skirt for Sister to wear in the spring, or maybe a button up shirt. Not sure what, but I just loved the subtle colors.
Still with me? Now that you have seen an idea of what can be done with this bundle, click on over to Whimsical Fabric and Me and buy this bundle! Also, be sure to check out the contest that you can enter by purchasing and sewing up this bundle. Then, come back to enjoy some cute kid pictures as my daughter had her own dolly and me Dessert Night the next morning.
Saturday, November 21, 2015
Color Me Fabric
Whimsical Fabric and Me is hosting their first ever Mini Make It Mine Challenge! The exciting thing about this challenge is that it is geared towards getting kids sewing! Grown ups can help, but kids need to be very involved in the process. This challenge runs now through December 14, 2015 and the details can be found in this blog post.
The challenge is based around using the Color Me fabric which can be purchased at Whimsical Fabric. Since it's release earlier this year, I have made several projects with it and have quite a few more in mind! There is also a GREAT Pinterest board with a ton of ideas that can be found here. Click on over and check it out.....seriously.
A quilt for the kids to share using the Easy Peasy Rag Quilt pattern from A Vision to Remember.
A super hero cape for my friend's son using the cape pattern from Fuddie Duddies. This cape is a little more work than the free tutorials and most patterns I have seen for capes, but I love the contrasting neckband and the gathers at the top. It is also reversible! Double win!
I was recently invited to a friend's baby shower. She was pregnant with her third son and mentioned that after having two boys and being pregnant with another boy, she didn't really "need" anything. So I used some Color Me fabric to make one of the stuffed animals from Ruby Jean's Closet. This elephant was seriously a naptime sew. It is my second time making an elephant from this pattern and they go together so quickly!
To get ready for the challenge, I volunteered to let my four year old daughter sew the sample project and take pictures during the process. It is really amazing at what kids can do when we give them the opportunity. Here are some pictures of Sister making a sleeping bag for her doll.
The challenge is based around using the Color Me fabric which can be purchased at Whimsical Fabric. Since it's release earlier this year, I have made several projects with it and have quite a few more in mind! There is also a GREAT Pinterest board with a ton of ideas that can be found here. Click on over and check it out.....seriously.
A quilt for the kids to share using the Easy Peasy Rag Quilt pattern from A Vision to Remember.
A super hero cape for my friend's son using the cape pattern from Fuddie Duddies. This cape is a little more work than the free tutorials and most patterns I have seen for capes, but I love the contrasting neckband and the gathers at the top. It is also reversible! Double win!
I was recently invited to a friend's baby shower. She was pregnant with her third son and mentioned that after having two boys and being pregnant with another boy, she didn't really "need" anything. So I used some Color Me fabric to make one of the stuffed animals from Ruby Jean's Closet. This elephant was seriously a naptime sew. It is my second time making an elephant from this pattern and they go together so quickly!
To get ready for the challenge, I volunteered to let my four year old daughter sew the sample project and take pictures during the process. It is really amazing at what kids can do when we give them the opportunity. Here are some pictures of Sister making a sleeping bag for her doll.
Subscribe to:
Posts (Atom)